Thursday, February 27, 2014

Beginner green and black nail art with stars


Hello everyone!

Today I'll show you a very easy to do manicure. I used the polish from the last blog post as base and came up with this cute design. The stars are from bornprettystore.com, but here's the full material list.


You can use code DILIC10 for a 10% site wide discount and free shipping.


The stars come in packs of a single color 200 pcs. They're about 3mm. The usual price for them is $3.37 but right now you can get them for$1.99 from the women's day sale.

They are made out of coated alloy and they're slightly curved so they fit the natural curve of the nail perfectly.

The video is not the best but it shows step by step how to do it.

Subscribe to my Youtube: youtube.com/deenailsx

Follow me on twitter https://twitter.com/DeeNails
Become a fan on Facebook https://www.facebook.com/DeeNailsX
Follow my Tumblr http://deenails.tumblr.com/
NEW! my Nailpolis gallery http://www.nailpolis.com/artists/DeeNails


Monday, February 24, 2014

Polished monday

because it's STILL monday and my internet decided to work...

Hello ladies, as I said, every monday I'll be showing you random favorites from my rapidly growing collection of nail polishes. I'm getting close to 200 so there's no way I can show you all, so this will be the ones that I like the best and that I use the most because...we all have faves.


Today's polish is a pretty green with gold glitter from Wet n Wild, megalast collection.

It is called "Fields of green" and I applied it over a black polish. I love glitters over dark colors , but that's just a little personal obsession.

I wish the picture would represent the polish exacly like it looks but the light was not in my favor at all.


I swatched 2 layers over black and base coat, with 1 thin layer of top coat. The glitter is CHUNKY, so it will need a top coat. It has such a pretty coverage.

The mix is predominantly green, with sparks of gold and orange, perfect for parties or casual spring wear.

You can find it at  most dollar stores, walmart, cvs, target wtc, for about $2. Cheap and pretty. It never peels off my fingers, BUT I always wear base coat.

I'll be using this for a design that will be posted on wednesday here and on youtube as usual.

Subscribe to my Youtube: youtube.com/deenailsx
Follow me on twitter https://twitter.com/DeeNails
Become a fan on Facebook https://www.facebook.com/DeeNailsX
Follow my Tumblr http://deenails.tumblr.com/
NEW! my Nailpolis gallery http://www.nailpolis.com/artists/DeeNails

Saturday, February 22, 2014

Stamping plate QA72 review and design

Hello ladies!

Today I'll show you one of my plates. I recently got it from born pretty store (by recently I mean about a month lol) and finally had time to make a review for it.

I Love their hexagonal plates the best because the images are so big and they come crisp and detailed on the nail. The round plates are good too, but not for full cover, only ig you have small short nails. Those plates are way smaller.


Anyway, this is number QA72. It has some leaf pattern, some lace and cherubs. My stamper dissapointed me greatly when I tried this plate. It's too small!!! It won't pick the whole image. So I rushed and ordered another one. This stamper I'm using in the video is super old, I didn't get it from BPS, but from walmart when I got my first stamping set. Well, it's time to retire it.

I have absolutely no cons for this plate whatsoever. If you like it, rush to get it because right now is discount to 0.99 cents from 3$.

My new 10% discount code is DILIC10.

Oh and don't you love that new triple shine polish from sally hansen? I just got it from cvs on discount for like $3 and I'm so in love with it.

Starting next week I'll have a "Polished Monday" event every week where I'll show you polishes from my collection with swatches and all.


Subscribe to my Youtube: youtube.com/deenailsx
Follow me on twitter https://twitter.com/DeeNails
Become a fan on Facebook https://www.facebook.com/DeeNailsX
Follow my Tumblr http://deenails.tumblr.com/
NEW! my Nailpolis gallery http://www.nailpolis.com/artists/DeeNails


Wednesday, February 19, 2014

Retro nail art with polka dots and bows


Hello ladies!

I made these 2 designs on the computer few months ago on a template I use when I get ideas. I finally decided to paint it on the nails, because I was in the mood to wear bows and didn't feel like gluing 3d bows on my nails.

The main product I used to achieve this look, is the set of acrylic paints from www.bornprettystore.com. I'll put a link for them in the material list. here it is:


Use code DILIC10 for a 10% site wide discount (yes it changed).

It's pretty easy. If you follow my video, all you have to do is pretty much paint a french, some dots and a bow on each nail with some small differences on the accent nail.

Hope you like it!


Subscribe to my Youtube: youtube.com/deenailsx
Follow me on twitter https://twitter.com/DeeNails
Become a fan on Facebook https://www.facebook.com/DeeNailsX
Follow my Tumblr http://deenails.tumblr.com/
NEW! my Nailpolis gallery http://www.nailpolis.com/artists/DeeNails

Tuesday, February 18, 2014

My experience with Splat hair dye

Hello everyone. Today I'll share with you something not related to nail art..hair dye!!!

I was a blonde for about a year, because I always wanna change my hair color. I've had red hair before and started to miss it, so I went back to it.

I chose Splat hair color again, because is the best red I've ever used. I can't say the same about other of their colors though.

I tried blue on blonde bleached hair and it didn't come out even, also it faded after about a week or less so I gave up on it.

The color I've been using is Lucious raspberries and I used it first time at the beggining of 2012. The color lasts bright for about 6 months for me if its over bleached hair, and then starts fading to pink but still looks pretty.


Taking the hair color out my my hair was a pain though. I went blonde after having red hair and even if the color was faded to a light pink it wouldnt come out not even with bleach. It took me few weeks to take it out completely with all the color removing products I could find. But in the end I came back to it.

First time when you do it you have to bleach your hair to a light blonde if you want it to last long and be bright. The box comes with bleach and hair dye. If you have long hair like me you'll need 2 boxes. Don't let the bleach sit on for more than 40 minutes or it WILL burn your hair. If it's not light enough first time, wait a week and bleach it again.

Don't dye your hair right after you bleach it. Wait a day or few days preferably if you can bare with the blond hair for a little bit. The hair dye is pigment, it's not like the usual hair dye. If you have bleach still active in your hair , the color might not come out as it should.

Watch out, this dye will stain really bad. Use gloves to avoid skin contact. If it happens, remove it with alcohol or with lemon juice, but don't let it sit on the skin too long.

You can let the dye sit on as much as you want. The longer it sits, the brighter it will be. I let mine stay on for about 3 hours before washing it. Wash it until water turns pink or clear. I personally can't wait till it turns clear, after 30 minutes of washing it was still coming out bright pink. Use a conditioner meant for color treated hair, something that will protect your hair color. I use color vibrancy shampoo and conditioner from L'oreal and repairing dry oil from L'oreal as well after washing my hair.

I have a red towel I use when drying my hair after shower because first few washes it will stain my white towels.

After dying your hair, avoid washing it with shampoo everyday. Use only water to wash it. I wash my hair with shampoo and conditioner every 4-5 days, but I'm also lucky to have normal type hair. It never really gets greasy.


Hope this will help you some and if you have questions don't hesistate to ask me! <3

Here's the final result


Sunday, February 9, 2014

Results of my nail growing routine after 3 weeks

I had a post about a very weird way I was trying to grow my nails, they they are paper thin and don't grow at all, or if they do, they breake in a second.

You can find the post here http://deenailsblog.blogspot.com/2014/01/how-to-grow-your-nails-when-nature-is.html

Well,  even if my way it's weird, this is the first time I actually managed to grow my natural nails.

This picture is from 3 weeks ago


And this one is from yesterday


Now I just have to shape them and I coated them with:

  • 1 layer of uv base coat
  • 1 layer of hard uv gel (clear)
  • 1 layer of uv topcoat
  • regular base coat
  • polish
  • regular topcoat
They don't feel bulky at all cause the layers are thin, but my nails are rock hard. I actually broke my thumb nail on my left hand 2 weeks ago, but fixed it fast with a patch of tissue and glue, buffed it so it won't be raised, and applied the above products. It doesnt look like my nail is broken, it looks just like the others.

Again, hope this helps!

Saturday, February 8, 2014

BPS stamping plate review and demo nr m69


Hello ladies!

Today I have a plate I've ordered from www.bornprettystore.com. Number m69, a pretty plate with 6 images, 5 big and 1 small one. I actually have 2 plates, but the video would take too long to try out all designs in just few minutes. Anyway, the plate is $0.99 cents right now, super cheap.

You can get it here

Use code DNLW10 for a 10% discount with free shipping in most countries.

The plate itself is pretty small, If you have long and bulkier nails it might not work for you. I have very small and narrow nails so if I use the stamper right (which I normally don't) I can make them cover fully.

I'm actually waitting for a better stamper because the one I'm using in the video its old and too small for my taste, even though it picks the images up pretty good.

I'm using a white from wet n wild to stamp. The polish on my nails it's a new polish my hubby bought me. It's called Hot & Sexy and it's from Broadway nails.

I really have no cons for this plate other than it might be too small for some people. It works great for me and it's a nice little plate to add to my collection.

Thank you for reading and as usual I have the video above for the demo.


Subscribe to my Youtube: youtube.com/deenailsx
Follow me on twitter https://twitter.com/DeeNails
Become a fan on Facebook https://www.facebook.com/DeeNailsX
Follow my Tumblr http://deenails.tumblr.com/
NEW! my Nailpolis gallery http://www.nailpolis.com/artists/DeeNails

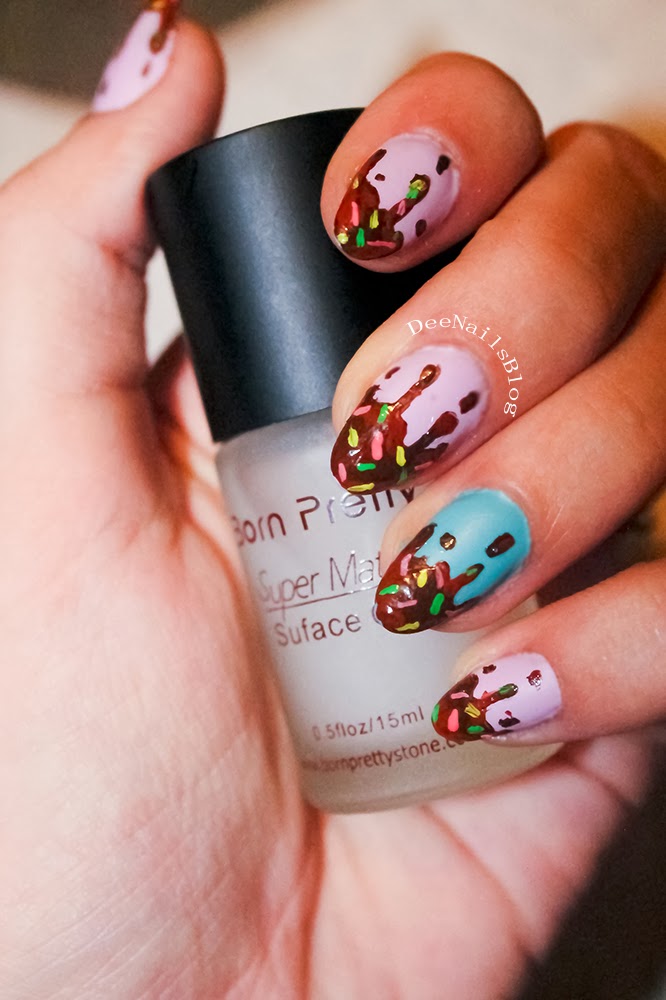
Dripping chocolate with sprinkles


Hello ladies!

Today I'll share with you a design I did a while ago for fun. It's perfect for valentine's day, since this is the day of sweets and chocolates.

I used pastel pink and blue, coated with one layer of matte top coat from www.bornprettystore.com.


Here's all the products used. Click on the to see where you can get them online:


  • LA colors - Bliss (dollar store, walmart)
  • WNW megalast- I need a refresh mint (dollar store, walmart, cvs)
  • Matte topcoat
  • 0000 nail art brush
  • acrylic paint (red, white, light brown, dark brown, green yellow)
  • top coat from broadway nails (dollar store, cvs)

Use code DNLW10 for a sitewide 10% discount and free shipping for most countries.


I coated the chocolate effect with high shine top coat. I used a dotting tool to carefully coat the drips, so the acrylic paint wont smudge in contact with water.

As usual, you have the video included here to see how I did it.

Enjoy!

Subscribe to my Youtube: youtube.com/deenailsx
Follow me on twitter https://twitter.com/DeeNails
Become a fan on Facebook https://www.facebook.com/DeeNailsX
Follow my Tumblr http://deenails.tumblr.com/
NEW! my Nailpolis gallery http://www.nailpolis.com/artists/DeeNails


Saturday, February 1, 2014

Vintage valentine's day design


Hello everyone!

Today I'll be showing you a valentine's day mani with some vintage style flowers I randomly started painting on my nails. I did it on my right hand with no design in mind whatsoever, just went with the flow. When I saw what came out of it I made a video on my left hand so here it is!


I used mostly paint to create this design, but here's all the tools and polishes I used:


Use code DNLW10 for a sitewide 10% discount and free shipping for most countries.

Hope you like it. It was pretty fun to do and it's somehow romantic :D


Subscribe to my Youtube: youtube.com/deenailsx
Follow me on twitter https://twitter.com/DeeNails
Become a fan on Facebook https://www.facebook.com/DeeNailsX
Follow my Tumblr http://deenails.tumblr.com/
NEW! my Nailpolis gallery http://www.nailpolis.com/artists/DeeNails