Sunday, February 14, 2016

Valentine's day nails


Hello everyone and happy valentine's day!

I love occasions like these to get my nails done a little festive.

I went with the classic theme of hearts. I love hearts and I love my always reliable stamping plates.

I used the reversed stamping technique for this design, because I found it a lot easier to get them on the nail where I wanted. i started with a white base and coated 2 nails with a very pretty polish I found from Broadway nails called "Juliette". Even the name is perfect for the occasion.


For the big patterns I used the plate BP-32. I emphasized the lines of the original pattern a little bit using the reversed stamping method. For the red hearts I used plate M56 that I cannot find in the store anymore to link it to you.

As stamping polish I used the little bottles set from BPS that you can find here 

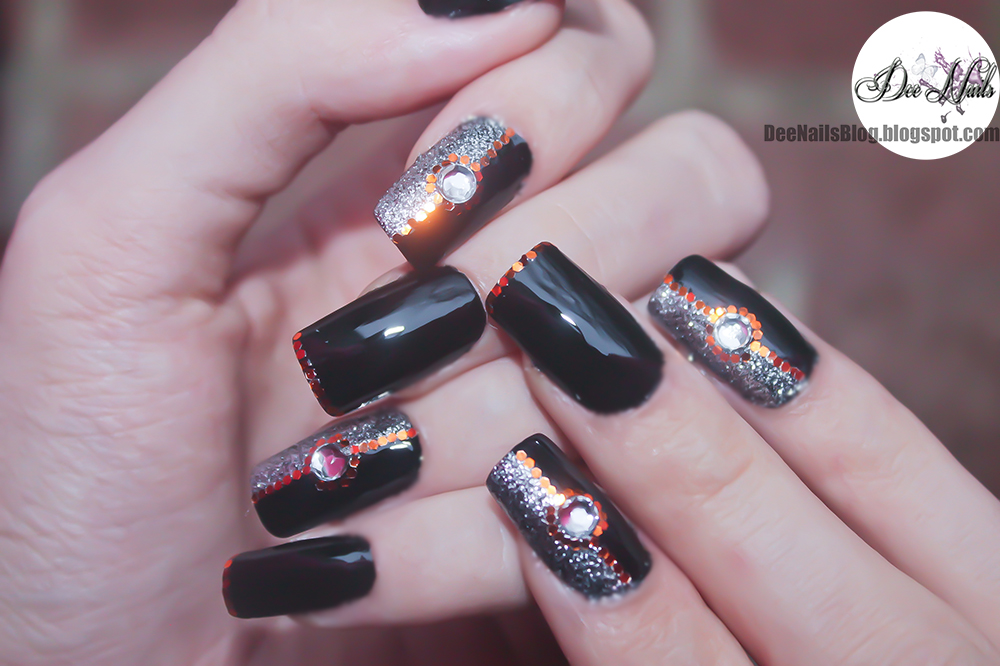
Now for the bling part I used a super cute, sorta new product that bornprettystore.com put out. It has a bunch of iridescent colored rhinestones in all sort of shapes. I used the bows and the classic round rhinestones to make the little pattern under my reversed french.

You can find them >here< for $4.55 on regular price but you can get them discounted right now. They are absolutely lovely and they catch sun light like little diamonds. There are about 200 pcs in there in individual chambers on the wheel.

The rhinestones were set using just tweezers and plain top coat. I sealed the whole design in high shine top coat from Broadway nails.

I hope you like it and that you enjoy your valentine's day at the fullest with your loved one, or if you're like me, with your pets.


If you like any of the products mentioned you can use the code below for a 10% discount and free shipping.

Saturday, January 23, 2016

Chevron tape roll review


Hello everyone!

Hope you guys are safe from the snow storms today. Since it snowed so much around here I went ahead and done my nails to suit the snowy nature around me. It's gorgeous, but damn cold.

Also, with my latest batch of nail art goodies I picked from www.bornprettystore.com I got this chevron tape roll that I was dying to try. I did something inspired by a winter sweater, with tons of glitter with a new polish I got my hands on at Walmart.


Now onto this cute sparkly roll of tape. It's pretty thick, there is a lot of tape in there. The tape itself it's layered in 3 slices set on sticker paper. What you see rolled there is actually sticker paper. You can peel individual slices of tape from it.

Since I needed 3 for each nail, I cut as much as I needed from the tape and used just like you'd use a sticker, using tweezers. The tape itself is pretty fragile , but had zero problems peeling it off my nails. It gives a lovely effect.


You can find it >here< for $2.99. Mine came in gold, but you can pick other glittery colors as well.

For my design I used a black base coat and 1 coat of a lovely polish named "RespeK" from Pure Ice. It's a dark purple with a lot of cold toned micro glitters, semi opaque.


I set on my chevron tape, like in the photo below, and using a sponge I dabbed silver glitter polish over the original colors. To get the best effect, peel the tape off right away before the polish dries. I used a sponge because that's how you get the maximum amount of saturation with glitter, even from a polish that is not very dense.


I used tiny 1.5mm rhinestones for my chevron nails and for the accent nails I used metal rings and 3mm rhinestones in the center, with some gold tear drop shaped rhinestones.

I sealed everything in high shine top coat from Broadway Nails.

I took the photos in the snow outside, I absolutely loved the effect of them. My fingers were a lil' swollen but it was well worth it!

I hope you like it and if you want to try out the tape you can use the code below for 10% discount and free shipping. Happy snow ball-ing!


Sunday, January 3, 2016

Start of the year manicure


Hello everyone and Happy 2016!

As a first post of this year I thought I'd share my nails I wore on new years eve and on my birthday 3 days later. I love love loveeeeee how they came out. I wanted a lot of sparkle on my nails on new year and I think I managed to have them.

They were a little bit time consuming since I applied the glitter piece by piece and I'm a little of a newb at using tape.

The polishes I used are:

  • black polish from Sally Hansen Hard as Nails
  • Pure Ice- Beware
What I did was coat all my nails with a black polish and on 2 nails from each hand I applied 2 thin coats of solid silver glitter. 


I used the tape to cover half my nail and paint a coat of the same black polish.

The time consuming part was applying the glitter. I used a marbling tool from my dotting tool set and 1mm orange hexies that you can find >here< . Yes its a huge lot of 70+ glitters of different shapes and sizes but that was 3 years ago and didn't even make a dent.

Before applying the glitter I used a 4mm super shiny rhinestones in the center of my black and silver nails and applied the glitter around them and right on the center, one by one.

I used just top coat to set everything, and surprisingly nothing is out of place still.

I used a high shine top coat from Broadway Nails to seal the design.


It was so crazy looking at the end the pictures don't do justice. They are super sparkly perfect for any new year or birthday party.

I hope you like them and I'm looking forward to share more nails I do at home in 2016. Even though I'm going to be a mom in mid May so they might get a little more rare.

Also, Happy birthday to me :3


Wednesday, December 23, 2015

My christmas mani+ holographic foil review


Hello everyone and Merry Christmas!

 Today I want to show you the manicure I did for Christmas, using a very cute product I received from www.bornprettystore.com. I never used anything like this before, so I had a little bit of newb trouble at first, but it all came out very cute.

The product featured today is a holographic nail foil that you can find >here<  for $3/07 on regular price, but you can find it on discount right now.


I chose pattern 77 because it looked pretty easy to work with. As I said I had zero experience with holographic foil. The mistake that I did was to let the top coat get tacky and then put the foil on the nail and rip off, then put it in another spot and rip it off and so on, like you do with regular foil. Well, I ended up making a mess and having to redo my nails.

The right way to use this foil is by waiting for the top coat until is close to dry. Works even on dry top coat. You cut a little piece off, enough to cover the nail, and then press it on the nail really good like it was a temporary tattoo. Watch for air bubbles and rub it really well on the nail for few seconds. When you're ready, slowly peel the foil off. And there you have it, a full pattern from the foil.


I had a lot of fun with it,  also used it on my toe nails for a little holographic spark. It so far lasted without a scratch with only 1 layer of top coat. It doesn't lift and it doesn't bubble. I recommend using it over darker colors for the full effect.

The polishes used for this design are:

  • NYC- Empire state blue
  • Pure Ice- Splash
  • Pure Ice- Beware
The stickers I used are also from BPS and you can find them >here< for $4.96. It's a huge set of stickers.


I hope you liked my design and if you want to try out the holographic foil, you can find even more patterns on the site and use my code below for a 10% discount on regular priced items and free shipping.

Happy holidays!


Saturday, November 21, 2015

BPS peel off tape review


Hello everyone!

I've had this cool peel off tape I've been testing from bornprettystore.com .
I don't know if I would call it liquid latex., it's a little different from it, it has a thinner consistency, but thankfully I like this a lot better because I'm allergic to latex.
This tape didn't make me itch at all.


You can find it >here< for $4.59 as a great alternative to latex tape. Also, this product has a sweet smell, is a little weird but did not bother me at all, and I am very sensitive to smells these days because of my baby on the way.

I have tested it for both clean up and as base coat. As base coat is good if you don't let it sit too long. It's great for swatching. If let sit and used with heavy polish and nail art and wore for few days is impossible to peel off. If you put thick coats then you can, but it will not come off in one piece. So if you are a swatcher who loves glitter, then this will work for you, especially if you have to swatch a lot of polishes at a time. It's a time saver.


Now as clean up it works wonders even applied in thin layers. It dries super fast, about 2 minutes. I'm not very happy with this nail art because the snowflakes aren't showing in photos like they should, but for the purpose of the review, meh, it will do.

You can apply your base color first and then the peel off tape or vice versa. If you're prone to mess ups then you can use it to avoid it, especially with dark colors.


I applied it on all fingers and then used the very messy stamper marbling technique to see if the tape would hold. You basically apply random dots of color on a stamper and then mash them on your nail. I used 3 shades of blue for this, for a wintery frozen type of look. It gets messy especially since this technique makes the colors muddy.


When it's partially dry you can peel the tape off. I used a pair of tweezers and it came off no problem. The result was pretty spectacular. There were some left overs here and there but that was my fault for not seeing where I'm applying the tape since it was the same color as my nail polish.


For the rest of the nail art I painted a bunch of snowflakes with silver polish on a stamper and sealed them in top coat. Let them to dry for few minutes then applied them on my nails randomly like stickers. I used this stamping polish you can find >here<


For accent nails I used small pieces of nail jewelry from BPS that you can find >here<

I recommend this product. It's great for fast clean up, fast swatching and best of all, there's no dryness from acetone clean up. Acetone causes wrinkles over time if used a lot in clean up, so this will be a saver.

If you like it you can use the code below for a 10% discount and free shipping. Happy shopping!