First of all, i'm definately not a professional in nail art or anything like that. I started this just a while ago because I was bored and my other crafting hobbies were starting not to satisfy me as much and they should. I've always liked to polish my nails, but unfortunately they were always short. My nails are very thin naturally, they were bending and breaking without me doing any effort for it whatsoever. In highschool I was always jealous on my friends who were having their nails done at professionals. That's how I came in contact with gel and acrylic nails. I didn't afford anything like that back then, but after i moved to USA i started thinking more and more to get my nails extended. After looking at the prices i came to the conclusion that i'll definately come out cheaper by learning how to do it myself. Not being a professional i didn't even think about getting those pricey big brand gels ($45 for a 0.5oz container) so i went for the ebay cheapies instead, which turned out to be better than i thought. I looked all over the internet to see what tools i would need in orders to do it myself and i bought everything on ebay for maximum of $100, which would be me getting my nails done at a nail salon 2 times or not even that. While i was waitting for my items to be shipped, i watched all the videos i could find on youtube about how to put on gel nails and i had everything in my head. Even like that, first time i did it it was horrible and got so frustrated. My nails just lifted and popped off in 1 day, having to replace them 2-3 times, one nail at at a time, until i got to see for myself what i was doing wrong. First time i put tips on and gel overlay which made my nails hurt horrible. I fixed that by setting the tips on the half nail instead of the end of the nail. They never hurt again. Also i fixed the gel lifting by coating my nail with 3 thin layers instead of 1 thin and 1 thich like i saw in the tutorial videos. I cured each thin layer for 2 minutes and 4 minutes at the end and believe it or not it worked wonders.
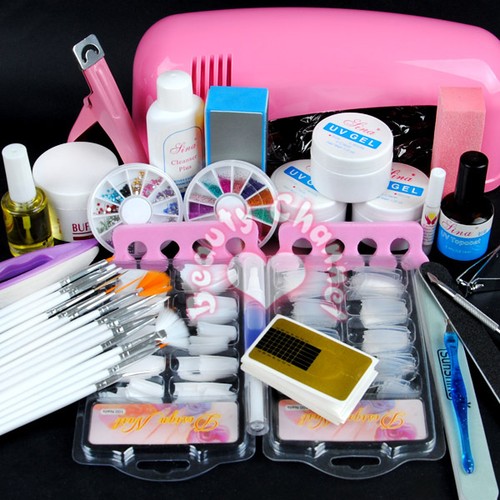
Now, here's a little list with things you need , and nice things that are optional. Thats what I got, that doesnt matter that you can't get big brand stuff if you want. For my buget, it was worth it.
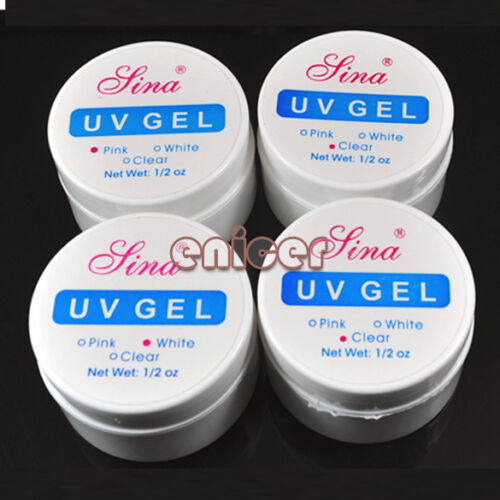
1. UV gel and UV lamp. I got them in BIG bundle that was 36$. I got a 9w lamp with just 1 bulb that works great. You can get a 36w one with 4 bulbs but the cheap one done the trick for me. The gel is Sina brand, not a big brand but works great for me. If i do it right, it doesnt lift, doesnt peel and doesnt chip, it can last over a month. Its true it gets really warm first few seconds in the lamp but if you take your hand out for few seconds it's easy to handle
2. Cleanser. Same brand, it takes the tacky layer off your nails when you're done and easy to clean the brushes with. (included in the bundle)
3. Buffer and nail sanding file. You use the buffer on your nails to smooth them after you take the excess gel off and the sanding file is used to shape your nails however you want. I recommend using the wide ones instead of the little metal ones because they work 10 times better. (included in the bundle)
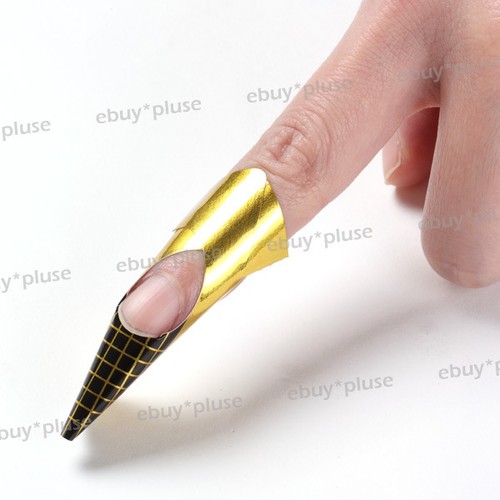
4. Clippers, cuticle knife, cuticle fork and cuticle oil. The big clippers are used for the extension tips and the small one is for clipping the natural nail. Trust me, the big clippers will be a time saver if you're using tips. Cuticle knife and fork are used for removing or pushing back the cuticles, because you can't touch them while working with gel or it will lift. You will LOVE the cuticle oil, it makes the skin around the nails so soft and healthy. I never used it before but now i'm addicted to it. (included in the bundle)5. Nail art brushes. They are so much needed for applying the gel and for painting tiny details on the nails. Now i can do so many things i couldn't do with the brush from my nail polish bottles. (included in the bundle)6) Extension tips. They come in a huge variety on ebay at a low price. I got 200 of them included in my bundle. 100 transparent and 100 white for french nails. I also got another separate pack of 500 white tips because that's all i use anyway. They were $47) Nail forms if you prefer to build the nail entirely out of gel. I had 20 included in the bundle and got other 100 for 3$. I rarely use them, i prefer using tips, but thats probably because i'm lazier when it comes about my own nails .8) Dotting tools. I use them for fine details and picking up rhinestones. And of course they are used to create the cute dots on your nails that are impossible to make using the nail polish brush. They were $4 for a pack of 5 tools with different size at each end, and a marbling tool.9) Acrylic powder and acrylic liquid. Used togheter are great for making 3D designs on your nails. I just started using them and they are so useful for making cute things. I also bought molds for making some shapes. The powder was 6$ for a pack of 18 colors, $5 for a set of 2 bottles of acrylic liquid (which smells really strong but should last me forever) and $10 for a pack of 30 molds each having different designs.
10) Other stuff. I searched on ebay for hours to see stuff that i would like, but which are optional. I got rhinestones, half pearls, color uv gel, stickers, A LOT of glitter. Each of those items were really cheap. I have a board on pinterest where I always share whatever i get from ebay and give links where to get them if you want them so you can always check it out here http://pinterest.com/psychoprincessx/cheap-cute-things-i-get-from-ebay/
Hope this helped if you want to start with nail art and if you're a complete noob like i am. This will be the place where i'll post my designs and reviews for new stuff that i'll be getting so feel free to stop by and look whenever. For now, enjoy my new noobish hello kitty design which will have a tutorial soon.
DeeNails has a brand new facebook page. Like and share it please. It would mean a lot to me <3
https://www.facebook.com/deenails0


very beautiful! good luck and post if you try some tutorials and show me!!! xoxoxoxoxxo
ReplyDeleterobin :D
thank you so much!! i was worried my start was a little off. you're always so helpful. i will definately show you. kisses
Delete