Friday, October 30, 2015

My Halloween nails


Hello everyone!

Happy halloween! Hope you guys have lots of fun at parties and trick or treat-ing.

With this occasion I'll show you the easy nails I did for myself for Halloween. It works great with the classic witch outfits or anything that involves black costumes with a femminine feel to them.

I didnt go the common halloween way this time and didn't do any pumpkins, spiders, ghosts, etc, that are the classic halloween manicures.

For base coat I used a bornprettystore.com peel off base coat that I am trying out right now and I'll show you the results in my next post. I used a heavy glitter topper that I know will be hell to take off, so I found it a great time to test that product.


I painted my nails with Broadway nails in "Gunmetal", a beautiful gray jelly filled with different sized glitters in oranges, reds, blues and greens.

For the tips I used some chevron guides from BPS that you can find >here<


The black polish I used for the tips is from Sally Hansen hard as nails.

Seal in top coat and for accent you can use some black bows set in a dot of nail glue so you won't lose them easy. My bows were purchased from ebay long time ago, but I'm sure they still have symilar products.


It was super easy to do, it doesn't really require any skill, since the chevron guides do it all for you. This might not be the central attraction with a costume, but they look very classy even outside halloween wear.

Hope you like them and for the chevron guides you can use my code below for a 10% discount and free shipping.


Thursday, September 24, 2015

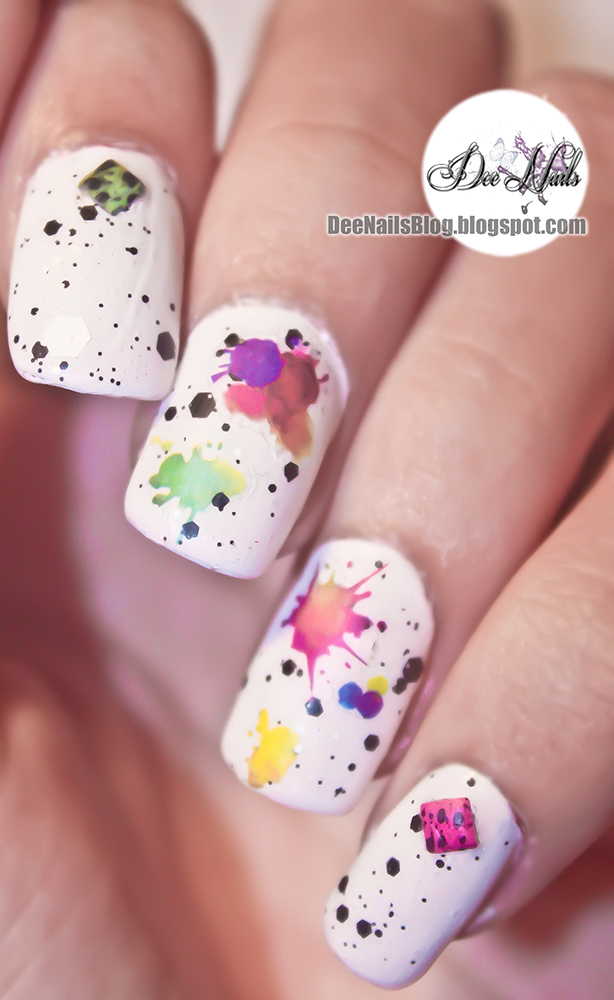
Fun paint splatters nail art


Hello everyone!

Super fun and and easy nail art today! I never really wore paint splatter designs like this on my nails before, so I am absolutey in love with it.

It's a very easy to do manicure, beginner level, anyone can do it.

I received a very neat sheet of splatter decals from bornprettystore.com. You can find them >here< for $3.69 on regular price but they are discounted now. I saw there weren't many reviews and demos for these decals, so I decided to give them a try.


There are a lot of stickers on the sheet. For my manicure I used about 8 of them and I barely made a dent. There are splatters and brush strokes on it, every color. They're perfect for any artsy person.

For the base color I used a white polish to make all those colors pop. I put 2 thin layers and over them I used a, what I like to call, dirt polish :D I used "What's the splatter" from Pure ice. You can normally find that brad at Walmart.


You have to let everything dry before putting on the decals. These are not water decals, they're simple stickers, very thin ones, but if the polish is not try, they will bubble under it and lift. Not even top coat will hold them down.

I applied my stickers on 2 fingers from each hand, and for all the others I put some  pink and green crackle studs from a wheel you can find at BPS >here<  They are $4.38 on regular price, but right now you can find them on discount.


I sealed everything with top coat and used a thin layer of matte surface oil to take the shine off. Matte oil will also speed drying time on the nail polish.

This design was overall very easy and fast to make. What takes time is mostly the drying time. Everyone can do something like this, especially with decals and the effect is so awesome!


I hope you liked it and if you want any of the above products you can use the code below for a 10% discount and free shipping


Thank you for stopping by!

DeeDee

Disclaimer: The product featured was provided for review. Everything else is purchased with my own money.

Monday, September 7, 2015

Temix stamping polish review


Hello everyone!

I am finally back to posting. I was unable to take photos and work with small details for a while because of a problem with my eyes, that still didn't go away. So if there's any blurr in my next photos is unintentional and please excuse it, but I'm still adjusting.

I have a very cute polish to review today. I was very excited to try it out since it was sitting on my nail art desk for couple weeks. I was very curious about the Temix stamping polishes, because my first and only special stamping polishes were from the born pretty store collection. This one is also from www.bornprettystore.com but not made by them.


You can find it >here<  for $4.00 on regular price, but I caught it on a discount of like 50% off. It is on discount even now so you can find it reduced pretty often. The polish comes in a bottle of 6ml, pretty small, but if you only use it at stamping it's going to last a long time.

The formula of it was pretty thin, but opaque. I thought it wasn't going to be a lot different from the BPS polishes, but I was pleasantly surprised when after I tried it on a white sheet of paper the design came out perfect. there were absolutely no spots where the polish wasn't picked up, and I used my bad stamper.


The difference between the other set of stamping polishes that I own and this polish, is that the Temix polish is not sheer at all. The other white stamping polish i used for this design is a little sheer, giving the outlines a little pink tint from letting a little of the base color go through.

Be careful though, the formula takes a little longer to dry compared to my other stamping polish. Let it sit 10 minutes before applying top coat, because it has a tendency to smear if even slightly wet.

I am definately planning on getting more colors. The color I used here it's nr 2, and they have 12 colors you can chose from.

For this particular design I used

  • WNW wild shine "french white creme" - base color
  • pink holo polish from Anchor&Heart laquer- base color
  • Salon perfect- "spirit fingers"- glitter topper
  • plate BP-73 for the rose pattern ($2.99 from BPS)
  • 1.5mm rhinestones


I hope you like it and if you try it you can tell me about your experience with the Temix stamping polish. For any of the products mentioned from BPS you can use the code below for 10% discount and free shipping.


Friday, August 14, 2015

100 posts anniversary top 10 favorite manis


Hello everyone!

I'm very excited because this is my 100th post. When I started this blog I didn't expect to last this long. I started it as a way to keep my PTSD in control by finding a hobby (nail art) and posting about it here. I have done a lot more than just what's on the blog, but I guess every girl who loves nail art changes it more often than people think is "normal" :P

For this I chose 10 manicures that I wrote about on the blog. My top 10 favorites. It was pretty hard to chose, but here they are. For each of them I'll leave a link to the post where you can get the info and products used.

They are in no particular order, because I like them the same.

1. Little mermaid inspired nails
http://deenailsblog.blogspot.com/2013/05/little-mermaid-inspired.html

2. Spider web nails (halloween 2013)
http://deenailsblog.blogspot.com/2013/10/halloween-2013-cartoony-black-widow.html

3. Candy nails (Christmas 2013)
http://deenailsblog.blogspot.com/2013/12/ive-been-away-for-while-not-in-my.html

4. New years eve nails 2013
http://deenailsblog.blogspot.com/2013/12/born-pretty-store-product-review-new.html

5. Polka dot nails
http://deenailsblog.blogspot.com/2014/06/new-matte-circle-glitter-review-and.html

6. Gothic nails
http://deenailsblog.blogspot.com/2014/12/gothic-new-year-nail-design.html

7. Anime nails
http://deenailsblog.blogspot.com/2015/04/anime-nail-art.html

8. Confetti nails
http://deenailsblog.blogspot.com/2015/06/colorful-confetti.html

9.Vintage nails
http://deenailsblog.blogspot.com/2015/07/vintage-floral-nail-art.html

10. Polka dots and bows nails
http://deenailsblog.blogspot.com/2014/07/colorful-retro-polka-dots-design-and.html


I have a lot more that I like but these ones have been my favorites. I didn't include the last one I done, because I wanted to make the old ones shine, but I would have gladly included the start fish manicure in my favorites list.

I hope you like some of them. I know not everyone is crazy about 3D nail art, but I am, and I wear and share what I like. I might have a future post about nail trashing that's happening a lot recently.  Respect what others like, and wear what makes you shine!

Thank you for being a part of my little blog for these 100 posts. I'll keep poring with more crazy nails.

All the designs presented in this post and on this blog are of my own creation. If you get inspired and recreate any design please do give credit by mentioning "Inspired by Dee Nails" when posting it on the net. Thank you!

Monday, August 10, 2015

Star fish charms


Hello everyone!

I was beyond excited when I received my mail from www.bornprettystore.com this week. It had BLING in it! I missed wearing nail jewelry.

So today I will be showing you these adorable and very sparkly charms. They are sorta new and you can find them >here< for $3.61 on regular price. To me these are incredibly cheap since most charms they have come in pairs of 2. This one comes with 10! And the charms I chose are pretty big.


My choice was pattern 781. They feature a really nice setting of rhinestones and faux pearls with a star fish. It is perfect for summer (yes it's still summer) and they catch the sun like crazy. One of the bigger rhinestones in there has a gorgeous rainbow shine. The setting is made out of metal so they can be reused over and over again.


For my manicure I opted for a water like base color. I coated my nails with white polish and made a gradient with 3 different shades of blue. I stamped my nails with one of the wavy patterns from plate BP-23

For my accent nails I used a dark blue polish from Sally Hansen that I overlayed with 2 thin coats of Pure Ice- Strapless, one of my favorite blue glitters ever.


I set the charms on my accent nails using nail glue. Just a little goes a long way, since these charms are light. This is one of my favorite nail art designs  that I've wore this summer. I've had the charms on for 5 days and they did not fall off or move in any way. I am in love.


I have to mention that these star fish charms are not for 3D beginners. They are very 3D. If you're not used to wearing something that is raised a lot off your nail, you might want to try some of the other charms from the same collection.

I hope you liked my little star fish manicure and if you want them you can use the code below for a 10% discount and free shipping.


Disclaimer: This product was sent for review. All opinions about it are honest and my own.