Saturday, July 19, 2014

Colorful retro polka dots design and review


Hello everyone!!!

I was dying to post on the blog but recently I've been struggling with insomnia and those of you who have it know how hard is to stay focused especially on writting or doing complicated nail designs.

Thats why I'm trying to get back in shape with some easier ones right now and what's better than polka dots?

I've got this item a while back and just now found the time to review it. It was part of my big Born Pretty Store haul that you can find here. It has a lot of products and pictures that you will like.

On to this product featured in this blog post. It has been on their site for quite a while now. You can check it out here


It's normally $4.39 for a full to the top jar. It has A LOT of product in it. I'm surprised it's not so popular yet, many people need to try it out especially if they like dots on their nails, as the process is 10 times more simple than using a dotting tool and so much accurate!

When it's not discouned you can use code DILIC10 for a 10% discount and free shipping. You will LOVE it.

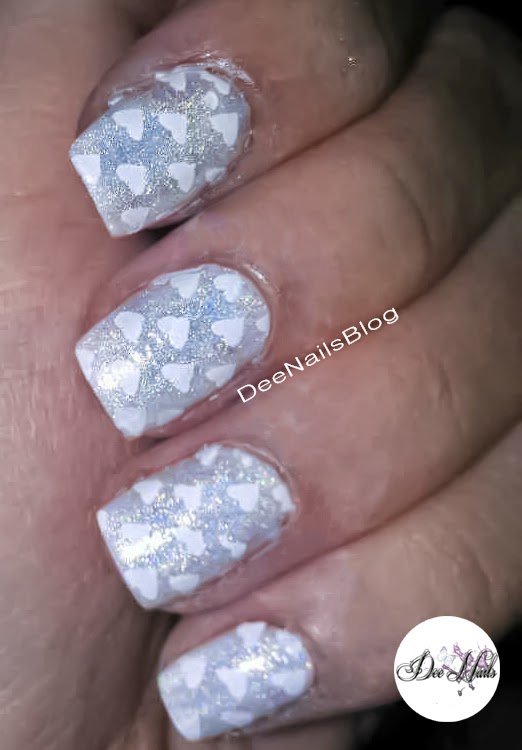
The sheets of glitter are perfectly opaque. It didnt let any color show through. They are super thin so you won't have to worry about it raising at all. Mine are sealed in only one thin layer of top coat and it feels like they're painted on.

Tip:  Before starting your nail design, put your glitter on a flat surface to pick them easy. Being so thin they can stick to eachother and you won't realise it at first, until one of them sticks to the top coat. Make sure they're separated by gently spreading them with your fingers on a sheet of non white paper or other surface.


I don't know if they are solvent resistant as I didnt try to add them to any polish yet.

For this design I used a blue polish from Broadway nails called Water proof and from NYC I used High Line green. 


I started with the blue polish on every other nail and all the rest with green..

I followed with a thin layer of top coat for my glitter and using my marbling tool i picked them up and put them on the nail. You can slightly slide them in position as long as the top coat is wet. When it gets sticky you won't be able to move them anymore.

I sealed the glitter with one layer of top coat and applied one thin layer of matte surface oil from Born Pretty store on all the nails to make the whole design matte.


The bows I used on my accent nails are from a pack of 60 bows I got off ebay.  One accent nail has a green bow the other has a blue one as I tried to match the polish color on both of them. I stuck them on with a little glue.


So far I cannot stop staring at my nails! It's been a while since I done something to them except the daily care routine and this design just POPS!

This glitter truly delivers the perfect effect of polka dots.

Thank you for stopping by!

DeeDee


Follow me on twitter https://twitter.com/DeeNails
Become a fan on Facebook https://www.facebook.com/DeeNailsX
Follow my Tumblr http://deenails.tumblr.com/


NEW! my Nailpolis gallery http://www.nailpolis.com/artists/DeeNails

Friday, June 20, 2014

New matte circle glitter review and design


Hello everyone!

Recently I participated in a product suggestion event held by Daisy from  www.bornprettystore.com and I suggested they added in the store some neon matte circle glitter, cause it's really hard to find outside etsy and rakuten. To my surprise they put out this amazing product almost imediately! I was thrilled and I got my own jar now to share with you all.


I loveeeeeeee it. Words cannot describe how much I adore this product. It's so cute and easy to use. If they put out black ones too I'm never using the dotting tool ever again lol.


The glitter shows a little bit of the color under it if it's dark. It's neon over white colors. The sheets are super thin, so they curve imediately to the natural curve of your nail.

The jar is 6g and it has mixed colors of glitter of 1mm and 2mm.

Once put over top coat you won't be able to slide it around and adjust its position unless it's on UV topcoat. It sticks to it imediately.

I have no idea if it's solvent resistant and if you'd be able to use it for franken polishes, but with clear acrylic it works fine.

By the time I received this, other colors became available, so head over to their site (or click the banner on the side bar) and check them out. I'm sure they have something you'll like.

You can use code DILIC10 for 10% discount and free shipping.


Now about this design. It was super easy to do.

I used some no brand gold shimmer polish I found in my stash as base color.

 I used a black polish from LA colors Art Deco to paint the area where the glitter goes. In my video I used my non dominant hand, so sorry for the mess. If you have trouble you can always use a flat (gel) brush with acetone to clean up around the cuticles.

I put the glitter on my nails over wet top coat and then sealed it with another layer.

I used a matte top coat from BPS over the gold polish to fade the shimmer and make those vibrant colors kick.

The video is not the best, but it shows step by step what I did.

I hope you enjoyed it and if you like this glitter as much as me have fun with it!

Thank you for stopping by!

DeeDee

Disclaimer: The product was bought by me. Review is honest and personal.


Follow me on twitter https://twitter.com/DeeNails
Become a fan on Facebook https://www.facebook.com/DeeNailsX
Follow my Tumblr http://deenails.tumblr.com/
NEW! my Nailpolis gallery http://www.nailpolis.com/artists/DeeNails


Tuesday, June 17, 2014

Under the sea


Hi everyone!

Today I'll be showing you a very simple manicure that I'm still wearing now cause I love it so much.

The center piece of this mani are the shell shaped metal studs from born pretty store. You can find them here for $2.79 in packs of 20 pcs of 3/5mm in gold and silver.


Use code DILIC10 for 10% discount and free shipping.

I started with 2 coats of Broadway Nails- Aquarius on 8 nails and 1 coat of Pure Ice- Strapless over black polish for my accent nails.

I painted the water bubbles with acrylic paint using a small detail brush.

You can find the paints I used here

I have an old tutorial on how to paint the bubbles from my previous little mermaid inspired nail art . Click the link for step by step pictures.


I sealed the paint in one layer of top coat and after it completely dried I stuck the shells at the base of my nails with a little top coat. They are completely reusable as long as they're not sealed, which is a plus considering they're only 20 in a pack.

I find this design adorable and practical as well. The 3D studs don't catch on anything and they're not too raised on the nail.

It's perfect for summer and seems to be trending, if you care about trends. I personally don't.

The shell studs have been provided for review by Daisy from www.bornprettystore.com

Thank you for stopping by!

DeeDee


Follow me on twitter https://twitter.com/DeeNails
Become a fan on Facebook https://www.facebook.com/DeeNailsX
Follow my Tumblr http://deenails.tumblr.com/
NEW! my Nailpolis gallery http://www.nailpolis.com/artists/DeeNails


Saturday, June 14, 2014

Black and white mani


Hey everyone!

Today I did Brenda's manicure again. She opted for something really classy.

I started with 2 coats of white polish from Broadway nails called "snow white".

Since I Cannot do french with polish at all I chose to do it with acrylic paint. For that I sealed the white with a layer of top coat and used a fine brush to create the french with black paint.

The paint has to dry completely. I applied 2mm clear rhinestones on the black tips for a bling effect.

To seal I used UV top coat and cured 2 minutes under 9w UV lamp.

Products were bought from bornprettystore and you can find them at the following links:


You can use code DILIC10 for a 10% discount and free shipping on everything in the store.

Thank you for stopping by!

DeeDee


Subscribe to my Youtube: youtube.com/deenailsx


Follow me on twitter https://twitter.com/DeeNails
Become a fan on Facebook https://www.facebook.com/DeeNailsX
Follow my Tumblr http://deenails.tumblr.com/
NEW! my Nailpolis gallery http://www.nailpolis.com/artists/DeeNails

Sunday, June 8, 2014

Hello kitty 40 years anniversary manicure


Hello everyone!

I'm a little late with this post..but hello kitty is celebrating her anniversary the whole year, so that's fine.

This was my anniversary manicure, really fun to do and easy. I love hello kitty, even if I'm 24 , I prefer to stay a big kid.

I don't have a video for this one, I tried making one, but my camera would not catch the hearts and the holo effect in any way, so I gave up on it.


Here are the polishes and materials I used. Click the links to see where you can get them.


Paint your nails white using a good white polish, preferably one that is opaque after 1 coat so you avoid building up polsih.

Paint 2 layers of a sheer silver holographic polish


After the polish dries completely, stamp a full pattern of hearts on all nails using white french polish. I used one from wet n wild.


Draw the hello kitty bows with red acrylic paint.


Outline the bows with black acrylic paint using a fine nail art brush.


On the accent nail you can use stickers or decals with hello kitty. Mine are from BPS but I dont think they sell them anymore. Add rhinestones in the middle of the bows.


Seal with top coat or gel top coat and voila!

Enjoy your super cute nails and wish hello kitty happy birthday!!

Thank you for stopping by! xoxo

DeeDee


Follow me on twitter https://twitter.com/DeeNails
Become a fan on Facebook https://www.facebook.com/DeeNailsX
Follow my Tumblr http://deenails.tumblr.com/
NEW! my Nailpolis gallery http://www.nailpolis.com/artists/DeeNails